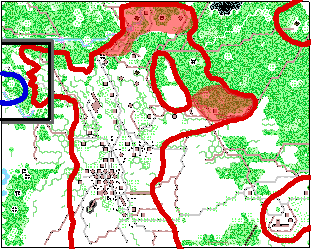
Red is the German Setup area.
Blue is where the Americans try to start their "springboard of victory."
The shaded areas are the mop-up spots the Germans called Game Two. The black and gray area is detailed later.
The Americans Ask for More
KGP I
19 Night
The German Diaries
Introduction
Game Two was hardly worth the effort. German units pushed control to the very edges of the board. For several turns, there were no American units on the board. Then they crept on and revealed two strategic locations only to have one capture the next turn.
 |
Red is the German Setup area. Blue is where the Americans try to start their "springboard of victory." The shaded areas are the mop-up spots the Germans called Game Two. The black and gray area is detailed later.
|
Intro
The American assault came as planned, along the western approach of N.33. It was night and we had a duel assault situation with the Germans going first. No waiting to see what would happen: we wanted action and we wanted it now.
The Americans had a small presence on the board. These were the ragged remnants of the previous battle, three and half squads, most reduced already but with support weapons and a single 7-0 leader.
The German idea was threefold. First, Gen. Phil, commanding the northern forces, made a line along the ridge and wanted to make that the battle area. And with good reason. The crest-slope ridge prevented any vehicles from crossing it, should the Americans be silly enough to bring "tanks" on. Second, the ridge provided good cover from the hedges and the hills. No stack without a leader could move or advance across the ridge. Third, it was unlikely the position would be flanked since it sat north of the entry area. American units would have to go plenty out of the way to flank. Last, it provided the secure north flank of the German position should Americans do really well in the forests in the south. Any advance could be surrounded if the Americans stretched the lines too far.
The more cautious Gen. Robert had the problem of fighting a night battle in trees against what should be a stronger force, at least initially. The Americans could mass their troops and flood one sector, namely mine. With the tight LOS from the trees and the enclosed area, I was ready for a bloody battle there. A sizable screening force would be setup with the intention of simply buying time for reinforcements to arrive.
The third phase of the strategy was decided from our overall situation. We had troops spread out from south of the small ditch to the northern most building. Since the Americans had a wide entry area, I decided to hold back the bulk of our forces, wait for him to commit and respond. We did not want him to bypass our area and then have to run after him; better to contain it first and then attack. The screening force mentioned above was to buy time and the everyone would fight together.
|
|
The Detail Area. That's N.33 running through the middle. The ridge is north of that and the bloody forest, to the south. The red line is the maximum area of American advance. The ridge was held by three key pieces, a HMG, King Tiger and a Panther. four squads and two dummy stacks were in the area. Force A was three squads and an 8-1. "B" was two squads and 8-0 and south of the gully was an engineer, paratroop and a 7-0. The German started by easily taking the foxhole and the broad advance found two stacks on minefields. The line would advance one more hex row. The American entry was a light recon force. USA B was four squads and USA A was three. But substantial forces were to follow. Three 9-2 leaders were on by turn 3 each with three squads. USA A had the Engineers, 3 7-4-7s with DC and a FT. But their advance was costly. As one stack advanced into USA B's area, German DFF, broke a 9-2, and the three squads with SFF killing off two of those. It would be an unlucky three rally phases before the leader rallied - only then to just leave the battle.
|
The Great Mortar Attack
A more curious aspect of the battle was the decisive ridge area. It was here, rather than the woods, the Americans choose to fight. Nine squads were committed for the attack. But the first wave was a relatively weak recon force. In fact, he moved a cloaked stack adjacent to what he had to suspect was a killer stack of our own. As it turned out it was the King Tiger. When we fired, the stack was four HSs each with a dismantled mortar. This drew fire and a CH from the King Tiger only helped, but we killed all four HS, leaving us with the hardware personally delivered to our doorstep. In the course of the battle, he was to occupy that hex on two more occasions but never removed any of the mortars.
So much for the first wave. Now the big boys came in. We were lucky to strip several stacks of their cloaking. One stack was the elite Engineers with DCs and the FT. Naturally, the FT and DC squad broke the first time they were fired at. Not that we had only one good shot and that broke them, he is attacking us where we are strongest. By this time we brought up another Panther and the one that started on the ridge, ventured out with infantry support. In the coup of the game, the American DC squad, laid smoke and advanced uphill into the it. This was a move that was not even legal but we did not caught it in time. He managed to survive all DF and actually place in against the vehicle. We thought this was a diversionary attack; he was coming from the front of a CE vehicle. There would be no effect against the Panther's 18 hull and needed a 3 against the turret. We were more afraid of the lurking FT.
When the FT did move. it was slaughtered. The manning squad was twice broken. It moved one hex. The other flanking infantry was likewise broken and reduced. The one stack to the very north, also three 667 squads and 9-2 leader, did nothing during the game. A sniper wounded the leader. minor fire broke one squad and the other two moved adjacent to a Pz IV. Needless to say, one squad broke and the other was all but helpless to do anything. The something bizarre happened. The DC on our Panther scored an direct hit on our weak armor - he rolled a '2' for placement. The TK number was now 13 on the Panther. Barring a dud, the big steel was history. Again, the Americans scored big and rolled a '2.' It may have been overkill, but at least the Panther went out in grand style.
In the course of three turns, we turned back the Americans and scored an 11 - 5 kill ratio. He is in full retreat. The north has been cleared and the strategic positions captured. In the south, two squads remain as well as two strategic positions. One 667/MMG is sitting a fox hole and the other 667/MMG is adjacent to that and the other strategic position. While I have the forces massed, it is Turn 7 and it ends on a 2. It is our goal to clear the entire board again of Americans.
End Game
The game end cleaned up everything as we thought it would. Some tense moments came in my southern sector when the sole-surviving American unit, sitting on a strategic position, went fanatic and created hero to boot. Literally, my last possible attack, and I had six of them, broke the unit and killed the hero. The game was over and we routed them off the map. The Americans managed to get only 4 1/2 squads off the map alive. The FT was busted and never repaired; the shame of was it only had one shot.
We start game four with absolutely no Americans on the board, but out numbered in replacements 3 - 1. The ratio as the units we killed.